![]() Prices in Canadian Dollars.
Prices in Canadian Dollars.![]() Prefer to call and speak to a floral agent? 1-877-277-4787
Prefer to call and speak to a floral agent? 1-877-277-4787

Plant Propagation
Plant cells, unlike animal cells, are totipotent. This means that any single cell has the potential to develop into a whole plant, “totally potent”. Every cell, both in the animal and plant worlds, carry the DNA for the entire organism. Only in plants, however, can you entice a single cell to reproduce more cells, and to grow into a new plant.
Plant propagators use this ability of plants to clone or produce genetically identical plants from a single cell, tissue, or organ of a parent plant. The larger the starting piece, the easier the growth of new progeny. For instance, to grow a new plant from a single cell requires specialized media, growing conditions, lots of skill, patience, and luck. To grow a plant from a completely formed cutting with stem, leaves, and tissues, missing only the roots, is as easy as putting it in a glass of water.
We will discuss the methods involved in cell culture and rooted cuttings, for the novice and the experienced grower.
THE SIMPLEST METHOD – A GLASS OF WATER
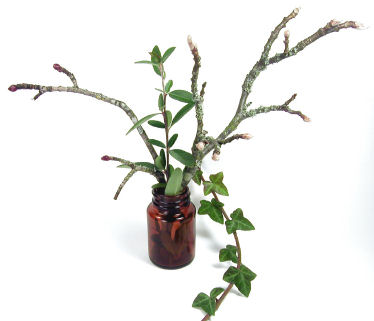
Plant & Tree Cuttings Many plants can be started from cuttings placed in a glass of water. Starting at the top, count down the stem at least four nodes. Cut the stem between the fourth and fifth nodes. Remove leaves from the bottom two nodes and place the cutting in water.
Use clean water in a clean container. Clear glass is best so you can see what’s happening inside. You can add a teaspoon of aquarium charcoal to the jar if you want. This will absorb some of the toxins and impurities in the water. Change the water regularly if it becomes cloudy or dis-coloured.
The cloudiness is caused by bacteria and fungi growing in the water, living on the decaying plant cells. To help control this problem you can wash the glass, and the whole cutting with soapy water (dish detergent works best), removing any squishy bits, and replace the cutting in clean water.
The dis-colouration of the water is caused by secretions of the plant itself. These are produced to help the plant fight off attacks from bacteria and fungi, but the compounds can build up in the water and harm the plant eventually.
Place the cuttings to be rooted in a sunny window. You do not need to worry about stress caused by a lack of water, since the cutting can take up all the water it wants. You need to encourage the healthy growth and development of the top shoots and leaves.
The cells and tissues in this top region, will produce a plant growth regulator, Indole Acetic Acid (IAA) which travels down the stem until it gets to the cut end where it accumulates. When it reaches a certain concentration, it will induce the formation of roots. On a normal, rooted plant, the IAA acts to promote the healthy growth of new roots. Commercial rooting powder from the garden center, contains IAA in low concentration. You dip the cutting into the rooting powder, and the IAA in the powder is absorbed into the plant and begins the process of root development. This is just a way to accelerate the process, or to get roots on difficult to handle plants.
Try just stem cuttings in water for the following plants: pothos, coleus, mint, anything with a square stem, vines, geraniums, impatiens, tropical plants, spider plants, grape ivy, pussy willows.
Once the plant has rooted you can plant it in soil in a pot. Some plants will survive indefinitely in just water. This is a simple form of hydroponics. Be sure to give the plant a weak solution of fertilizer once in a while, as there are no nutrients in the water.
STEM CUTTINGS
 Most people are familiar with the methods for taking stem cuttings from plants like geraniums to produce many new plants from one ‘mother plant’. These new plants are genetically identical to the parent, they are called clones.
On many species of plants, the new roots will form adventitiously from the node. This means that the roots will develop in an adventurous way, out from a node on the stem. Some plants are so good at producing roots, that new roots will also grow in the internode section of the stem, not at a node at all.
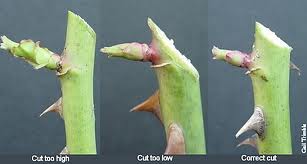
Make the Cut. To improve the success of rooting, stems for propagating should be cut between nodes, leaving a short stub of internode only. The roots will usually form at the node, and the bottom piece of internode tissue may be attacked by pathogenic fungi and bacteria. If the internodal section below the node is long enough, the root formation will be unaffected by the deterioration of the cut end of the stem.
If the internodal section is too short or if the cut is made too close to the node, the root development can be hindered by the damage to the internodal stem section. Do not cut the sections at the nodes.
Remove the leaves from the bottom two nodes, so they won’t be buried in the rooting medium. Cut these off cleanly without damaging the stem. The cutting should have at least 2 – 4 nodes with leaves intact, two more at the bottom, with no leaves, and a short piece of internode below the lowest node. It is not necessary for all the cuttings to have terminal buds. You can cut a long stem into several sections, from top to bottom, as long as each section has enough buds and nodes to produce leaves, shoots and roots.
Some plants will produce adventitious roots along the internodal section. This is common when growth regulators are applied and absorbed into this section of the stem. Some plant species are quick to root, and un-specialized as to which part of the stem will produce roots, although more roots are usually produced at nodes.
Growth Regulators. The production of roots is controlled by the movement of plant growth regulators within the plant. The leafy shoots and leaves at the top of the plant produce indole acetic acid and other similarly active compounds which travel to the base of the stem. They act on cells at the bottom of the plant to stimulate root growth in whole plants, and in cuttings. Therefore, it is important to have cuttings with healthy leaves and shoots at the top end as well.
Environment. Rooting can be stimulated by providing a moist environment for the plant, reducing stress on the water transpiration and absorption system in the plant, and by providing a hospitable soil environment for the growth and development of roots. The soil mixture should be fine and soft, moist, and easy for new, young roots and root hairs to penetrate. Keep the cuttings in slightly moist soil, and cover with a plastic bag to help to provide the correct environment. This will reduce the rate of transpiration of water from the leaves, and thus reduce the water stress on the un-rooted cutting.
Soil. Use a good grade soil-less mix containing peat moss, vermiculite or perlite and some sand if available. For the very early stages, you can use straight perlite or vermiculite to root cuttings. Do not incorporate any garden or black soil into your rooting media as this will introduce soil pathogens and weed seeds. Once the cutting has rooted and has re-established its defense mechanisms, it can go into a soil mix which includes black soil. The potting mix you buy at the hardware store is usually too heavy and contains too much black soil to use for propagating. Try mixing it with half peat moss to make it lighter for potting up your full grown, rooted plants.
Pathogens – Bacteria and Fungi. If the environment is too moist, however, you will increase the growth of pathogenic bacteria and fungi, so the soil should be allowed to dry out between waterings, and cuttings should be monitored regularly for signs of fungal damage. As the plant develops roots, you can cut small holes in the plastic bag, or leave it open slightly at the bottom, and gradually remove the plastic altogether.
You can use Equisetum, horsetails, as natural fungicides. Just mix dried, or fresh horsetails in water, allow to sit overnight, and pour this ‘tea’ on the plants as a soil drench at weekly intervals, when watering. You can also mix dried, broken horsetail stem pieces into your soil mix when potting the cuttings.
THE NEXT HARDEST WAY TO PROPAGATE A PLANT – FROM SEED
 If you can get seed off a plant, of course you can plant it in soil, or sand, inside or outside, and get many wonderful things to grow. Be sure to read the instructions on the seed package. Many seeds have special requirements. Some need to be placed in the cold refrigerator for a few days or even months before they will germinate properly. Some need to be planted outside in July rather than May.
Seeds are little packages of exactly right genetic materials to produce a plant like its parent. The embryo does start out as a single cell, but it has the help of the rest of the seed to produce roots, shoots and leaves.
See Bedding Plants from Seeds for more details.
SPECIAL PLANTS
There are some plants that will produce new plants in unusual ways. Many members of the cactus and succulent families of plants, desert plants, are very easy to propagate from stem cutting, petioles, leaf sections, even small stem sections. These plants are from a harsh, dry environment, so they are programmed to take every advantage to develop a new plant.
Try taking any piece of a jade plant, a whole stem section, a leaf with a petiole, a whole leaf without a petiole, even a half of a leaf. Let the cut pieces dry out overnight, this will allow a callus layer to form over the cut ends. This reduces the possibility of infection and also gives a good start to root formation. Lay the pieces on a pot filled with a mix of peat moss and sand (desert plants like sand). You could cover the pot in a plastic bag, but this is not necessary if the pieces are buried a bit in the soil. Water well and put in a sunny window. Allow the soil to dry out before watering again so you don’t have fungus problems. New roots should form in about two weeks.
This method will work with many succulent and cactus plants.
Begonias will grow roots from the veins in the leaves. Cut a large healthy leaf and make small cuts or breaks in the major leaf veins, one cut for each main vein. Lay the leaf right side up on a peat moss and sand mix. Make sure there is good contact between the leaf and the soil. You can put small pebbles on top of the leaf to weight it down, or pin it in place with toothpicks or wires. Cover the whole thing well in a plastic bag and put in a sunny window (not too sunny, or the plant will get steamed in the bag). Roots will form at the break sites on the veins. Then the roots will send up small new shoots. When these are large enough, you can cut them away from the main leaf and re-pot them in their own pots.
Spider plants and other plants like strawberries send out small plantlets on runners. These runners are actually modified stems, and the plantlets come fully equipped with roots already. This type of plant is very easy to start. You can just cut off the small plants, re-pot them in their own pot and stand back. To give them a head start, you can leave them attached to the parent plant for a while until the baby is well established in its new home. You can also put the babies in a glass of water until they get more roots before planting in soil.
Lots of plants grow multiple shoots up from the same root. It is very easy to split the plant into many small ones, each with a root and a shoot and re-pot the small plants separately in their own pots. This is called ‘division’ and is a common method for plant propagation. Try this on anything that has a bushy bunch of shoots coming out of the crown.
FROM A SINGLE CELL
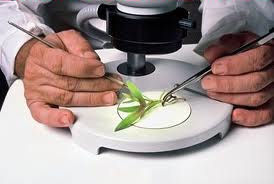 Cuttings In a laboratory, you can take small pieces of the plant, wash them, and reduce them down to a pieces of just a few cells. If you put these cells in a good growing environment, they will divide from one cell into two and two into 4 until there is a large mass of cells. With further manipulations, you can get a whole plant to grow from a few starting cells.
The culture conditions have to be just right to get the original cells to begin to divide. You must feed them appropriate nutrients, including, nitrogen, phosphorus and potassium, minor or trace elements and some growth regulators. You also have to include some antibiotics to keep bacteria and fungi from growing. You can use the same nutrients to make a liquid or a solid media for the cells to grow in.
The first single cell culture media is often a liquid, so it needs to be shaken regularly to keep the culture aerated and the cells from all falling to the bottom. The growing cells need light and heat too, just like a normal plant.
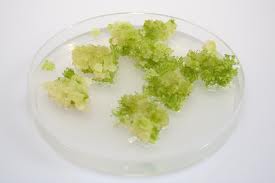
Over several weeks the clumps of growing cells get larger and larger. You can move two or three small clumps smaller than a pea, into a petri plate filled solid media, made with a gelling agent. This media will contain a carefully controlled amount of a specific plant growth regulator, designed to induce the cells to form shoots and leaves, and not just more cells. Once the little plants have a few leaves, they will begin to produce their own IAA (Indole Acetic Acid) which will travel to the base of the plantlet, and accumulate there to induce root formation. Nifty!
During this stage of development, the small plants are increasing in height, and may be getting too big for the petri plate. They are transplanted into large jars containing the same growing media and allowed to develop into larger plants. Once they are strong enough, they can be transplanted out into pots with regular soil and put in the window or outside.
The original cells that you started with are meanwhile still swirling away in the light and they are still dividing and making even more new cells. You can continue to take new pieces out of this culture, place them on solid media, and induce them to produce new plants. You can get thousands of plants from the single cell you started with, and they will all be genetically the same, they will be clones.
THE MAGIC TRICK
 The key to all of these types of plant propagation is the ‘decision’ by the plant cells to organize themselves into shoots and roots, or to stay as undifferentiated cells. These undifferentiated cells can continue to multiply indefinitely, and can form large cell masses in culture, and on the living plants. They are known as callus cells, the same as when you have a callus on your heel, from shoes that rub. These are also undifferentiated cells, laid down to protect your heel from the chafing shoe.
In plants the callus cells and tissue form at the base of the stem cutting, in the wound in the begonia leaf, on the cut edges of the jade plant cuttings and leaves, and in the cell cultures. The change from undifferentiated callus cells to organized shoot and root tissues is mediated by the levels of various growth regulators in the plant. In cell culture we had to add these growth regulators externally in the media. In plants with leaves or roots, the growth regulators are produced by the plant and transported to the site of action.
The roots produce cytokinins which travel to the top of the cell mass, or stem, and induce the development of shoots and leaves. The leaves produce auxins like IAA which travel down the stem to collect at the base and induce root formation. The balance of these two and other growth regulators controls the even growth and development of the plant.