![]() Prices in Canadian Dollars.
Prices in Canadian Dollars.![]() Prefer to call and speak to a floral agent? 1-877-277-4787
Prefer to call and speak to a floral agent? 1-877-277-4787

Recreational Activities
Recreational Activities
Have some fun creating these floral crafts with flowers and grasses from your very own garden! (To learn how to dry your flowers and grasses go to our Flowers for Drying section.)
Quick Links
Basic Potpourri

Required Materials:
- 20 litres flowers
- 4 or 5 ml essential oil
- ½ ounce orris root
- various spices, herbs, flavorings, berries, etc. optional
This recipe will produce about 20 L of potpourri.
Start with approximately 20 L of dried flowers, fragrant leaves, herbs, berries, and kitchen spices, orange and lemon peels, and anything else you like. Choosing the ingredients is the fun, creative part, so go wild. All of the ingredients should be crispy dry, and cleaned of any discolored petals, large twigs, and debris.
Working in a clean, heavy plastic bag, (a large garbage bag is good), mix all the flowers and spices once to start.
Add 4 or 5 ml of good quality essential oils, one half at a time, drop by drop to the top of the mix. Seal the bag and roll it around to mix well. Add the remainder of the oil and stir again. The essential oils are the main fragrance of the potpourri. You can add more fragrance with scented flowers like lavender, leaves like rose geranium and herbs such as mint, marjoram or thyme, old perfume and bath oils, vanilla and almond flavoring and so on, use your imagination.
Next sprinkle 1 ounce of orris root over the top of the mix, The orris root is a fixative and will hold the fragrance in the potpourri for years. Other fixatives are cedar wood, clary sage, reindeer moss, and gum benzoin. Be careful when you re-open the bag, not to lose too much of the orris dust, and try not to breathe in the dust.
Seal the bag tightly and store in a closet for about one month to allow the potpourri to mature. You should take the bag out and stir it about once a week.
You can start using the potpourri after the first month. It will continue to age and develop over time. You can add more flowers, leaves, oils, etc. as you go along, just be sure to have enough orris root or other fixative to hold everything
together. Save the last 2 or 3 litres of your mix as a starter for the next batch, just like sourdough bread. Good luck and have fun.
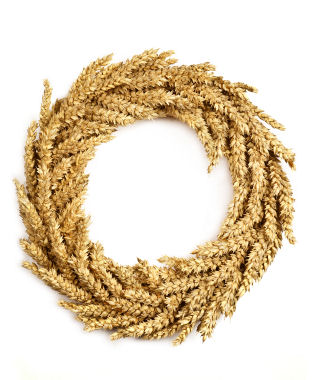
How To Make a Wheat Wreath
Required Materials:
- 6″ wreath base, willow, grape or other
- 2 or 3 – 8 oz bundles of wheat, or grains or grasses
string
- rubber bands
- flowers if you choose, but not necessary
- one metre paper ribbon or raffia for a bow – optional
1. Cut the wheat to approximately 6″ stems, for easier handling.
2. You will need to make about 20 small bundles which will attach to the wreath base. These are flat, two dimensional bundles, seen from one side only.
Lay out 4 or 5 wheat stems, so that the heads are aligned.
Lay 2 – 3 more stems on top of these so that the heads of the first layer are visible, and the heads of the second layer hide the stems from the first layer.
You can stop there for small bundles, or for larger bundles add one more layer, making sure all the heads are visible in each layer, and all the stems are hidden. The bundles should be triangle shaped, with the wide end at the top. Make longer bundles 6 – 8″ tall for a large wreath with a wide fan out from the centre. Make smaller bundles 3 – 4″ long for a standard wreath.
Cut off stems evenly, as short as possible, leaving about 1 inch only and secure tightly with a rubber band close to the bottom of the stems.
Set this bundle aside and make 19 more!
3. You can add flowers to any bundle by making one layer out of flowers, or incorporating one or two flowers in a layer with the wheat. Each bundle should be attractive on its own. The bundles don’t have to be identical. If you add flowers don’t put them in the same position in each bundle. Stagger them so that sometimes the flower is at the top of the bundle, then in the middle and then at the bottom.
4. Longer bundles will fan out of the wreath circle farther and result in a larger wreath. You may need to make more bundles if they are tall and thin. Short fat bundles will fill faster, and the wreath will be a smaller diameter finished.
5. When you have all the bundles done, you can start tying.
Tie the string firmly to the wreath base, leaving a long tail.
Place one bundle at a 30 degree angle to the wreath and wrap the string tightly around the stem ends, once or twice. DO NOT make a knot and cut the string, just keep winding around the next bundle. You can tie off the string when you want to stop to take a break or to make some more bundles, but otherwise just keep going. Make sure you pull the string tightly at every pass.
Using the same string, add another bundle to the bottom end, hiding the stems, rubber bands and string of the previous bundle.
Usually you can get two good bundles on the outer edge of the wreath, then add one small bundle to the inside edge. Don’t use large bundles on the inside or you’ll fill in the hole in the middle.
Continue adding bundles until you come around to the beginning again.
The last few bundles have to be tucked underneath the first few bundles with the string carefully drawn through so it doesn’t show. You can also glue the last few bundles in place.
An alternative way to finish the wreath is to leave these last few bundles out and put in a bow instead.
6. The wreath is now done. You can add small bits, flowers or extra wheat heads by gluing them in where you want them.
How To Make a Wheat Swag
Colors:
The basic arrangement needs only 3 colors. The main color (pink, for instance), the contrast (blue, to go with the pink), and the filler (could be baby’s breath, German statice, or any other neutral color). Once you have this main color scheme figured out, you can add small bits of yellow, orange, purple, or any other colors for accents, as long as you keep your main colors predominant.
Required Materials: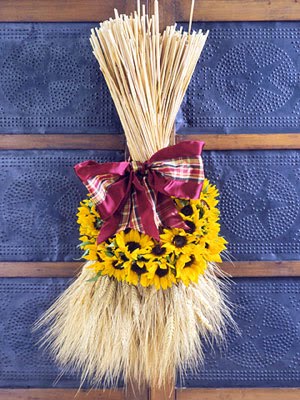
- Background – 2 – 8 oz bundles of wheat (can substitute eucalyptus, salal, any long stemmed greens, etc.)
- 10 or more flowers, roses, strawflowers, larkspur, carnations, any type of the colors that you like. Individual flower heads can be glued in place.
- 1 bundle green leaves (salal, bay leaf, etc)
- 2 small bundles flowers to finish raffia for bow
- string for tying
rubber bands
This is a sequential addition of shorter and shorter bundles to a wheat base. You can use other materials as desired. Choose tall stems for the backing, and use up your short pieces for the centre decorations. When adding bundles to the wheat background, try to lay them side by side rather than on top of each other, so that the centre doesn’t get too tall. Try to alternate colors, texture or form in each layer of flowers, to get an interesting contrast between each type of flower.
TO START:
1. Divide one bundle of wheat into 6 approximately even bundles and align the heads in each bundle so that they make a flat fan.
2. Cut stem ends to make an even butt end and secure with a rubber band.
3. Lay 1 bundle down and measure out 1 more bundle on each side of it, so that the are heads slightly lower than the center bundle. You can, if you want, add more and more, shorter bundles of wheat along the sides as you go to give a wheat background for the whole piece.The background can be made of many different materials, such as eucalyptus or salal, but the construction method is the same. Try mixing several different kinds of grass and grains, or two or three different leaf shapes and sizes.
4. Lay the two center bundles end to end so that the ends overlap about 4 – 5 inches. Tie together securely, side by side, with string along the overlap. When you tie the first knot leave a long tail end of string for tying off to as you work. NEVER CUT THE STRING.
5. Add the side bundles of wheat one or two at a time and tie them to the center bundles with the string, overlapping the stem ends the same way. Make sure the string is tight enough to keep the shape you want. Lay the side bundles along the center bundles so that the heads are slightly shorter than the center ones. You want to make a rounded fan shape with all heads around the edge.
6. Using the wheat background as a measure, make two bundles of the greens so that the leaves cover the wheat stems, but do not obscure the heads.
7. Make two flat fans of greens, fasten them with rubber bands, then tie them individually to the wheat base. Use the same string to wrap tightly around everything then tie a knot with the left over tail end of the string. Do everything twice! Make two similar bundles of greens, one for each side. DON’T CUT THE STRING.
8. Arrange the flowers on top of the green leaves, either in an even row or mixed in with the leaves, irregularly. Make similar bundles for each side.
9. Here’s where you can get a little fancier. Try mixing the flowers with baby’s breath, annual statice, German statice, or any other flowers, grasses or leaves you like. Every flower, leaf or grain head should be visible, not hidden by another stem.
10. You should be close to the centre of the swag at this point. Finish off with small bundles of flowers tied with rubber bands and tied onto the swag base. Keep both sides the same or similar.
11. If the swag looks too thin, or has open spaces, you can now fill in with small bundles of wheat attached to the sides to make a more bow-tie shape, or glue in small bunches or individual flowers to fill holes.
12. The open space in the centre, will be showing all the construction, string, stems etc. Cover this with a generous raffia bow. A few flowers glued into and around the bow can be attractive.
13. Hang your swag on two finishing nails, spaced about 4 – 5 inches apart. Or you can make two loops from wire attached to the back of the swag and use these for hanging.
You can vary this design by mixing up the layers, starting with green leaves, then the wheat, or skip the wheat and go straight to the baby’s breath and roses. Remember to have a good strong background between the wall where you’ll hang the piece and the nice flowers on the inside of the arrangement. Don’t, for instance, start with white, fine baby’s breath at the back to hang on a white wall, you won’t see the baby’s breath against the wall.
Most important of all, have fun. This is supposed to be a creative, relaxing, therapeutic hobby, not a stress filled nightmare.
With good flowers and greens, it’s hard to make a bad arrangement so feel free to be yourself. Go wild!
How to make your own Easter Basket
It’s easy to make a fancy Easter Basket for collecting your Easter eggs and goodies.
Required Materials:
- one basket with a handle
- a bit of green moss
- small bundle of dried flowers for a bow.
1. Line the bottom of the basket with the moss to make a nice, soft cushion for your precious eggs.
2. Make a one-sided, flat bouquet from the dried flowers. Put the tall ones at the back and the shorter, more colorful pieces in the front. Cut the stems off short, and tie with a rubber band.
3. Fasten the bouquet to the inside of the handle with a piece of string, wire or ribbon, so that the bottom of the stems is tucked inside the moss and can’t be seen.
4. Attach the bow to the inside of the handle as well to hide the bottom of the bouquet.
You’re done! Time to start looking for those Easter Eggs and treats!
How to Make an Easter Tree
Easter Trees are traditional Easter decorations in many European countries. They are just beginning to be known in Canada. The trees serve the same function as our Christmas Trees, you can hang decorations and gifts from the branches, and you can put more presents underneath them.
Usually Easter trees are less then 4 feet tall, often only 1 – 2 feet for a table top arrangement. They can be made from any twigs or branches. We like to use well branched and pretty stems of pussy willows, but you can use dogwood, birch, poplar, or any other garden trees.
You can really jazz up the arrangement with branches of a spring flowering shrub or tree like Nan king Cherry, Golden Currant, Apple or Crab apple, or Plum and Cherry. You’ll have to cut these branches about one month ahead of Easter and force them into flower in the house to have them flowering by Easter. Just keep them in clean water in a sunny window, and the buds will develop as if they were outside.
Required Materials:
- 3 – 5 branches (willow, dogwood, flowering stems, or bare winter stems, well branched)
- Container – basket or ceramic, or clay pot. (Make sure the container is large enough, and properly proportioned so it won’t tip over when the tall tree is in it)
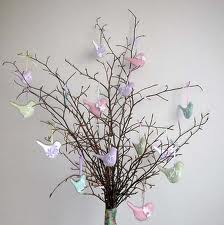
- Oasis foam for the bottom of the container. (If you want fresh, flowering stems, you must use fresh flower Oasis. For pussy willows or bare stems you can get away with dried flower foam. You can find this at craft and flower shops)
- Moss to cover the top of the basket.
- Decorations – flower heads, bows, paper cut outs. (Get the children to make these. You can buy chocolate and candies to hang up, and you can buy authentic Easter tree decorations at some import stores like Dansk Gifts)
1. a. For a pussy willow tree stuff your dried Oasis foam securely into the container so that it sticks up over the edge about 1 cm.
1. b. For a tree with fresh branches you have to use a leak proof container and well soaked fresh flower Oasis.
2. Cut the bottoms of the branches at a sharp angle so that they poke into the foam easily.
3. For a fresh tree, wet the moss and completely cover the foam. For a dried tree, glue the dry moss onto the foam for the same effect.
4. Finish the tree with decorations and have fun decorating it!
How To Make a Christmas Spray
Required Materials: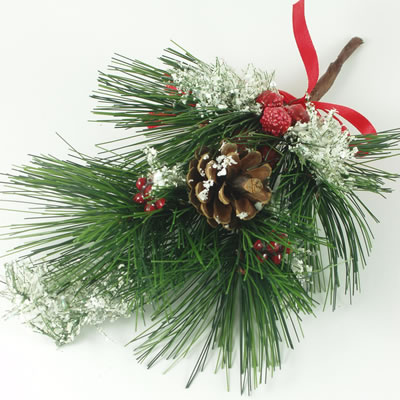
- 5 – 6 branches of fresh Christmas greens, cedar, pine, or fir.
- Bundle of dried wheat, red and gold accents, maroon is popular this year, even pink can be used.
- A large bow – Christmas colours, red, gold, green, raffia, paper twist, your choice.
- Rubber bands
1. Make the background using the fresh greens, laid out in a fan shape, secured with a strong rubber band. A mix of types of greens is attractive, or try just cedar or pine alone.
2. Lay the wheat in a neat bundle on top of the greens. If you make several smaller bundles of wheat and arrange them side by side, you can get a large fan shape. Once you have it the way you want, fasten the wheat bundles to the greens with another rubber band. The wheat should be short enough so that the greens are sticking out behind the wheat and clearly visible. Don’t make the wheat so tall that it hides the greens completely to the top.
3. Lay your accent colours on top of the wheat bundles. Take care not to let the stems of the wheat show, just the heads. Build in a good contrast of colours, forms and textures. This is the most decorative part of the spray so take time to make it attractive. Tie this small bundle with a rubber band too. You can make two or three small bundles and arrange them on the top to give a more full look.
4. Attach the accent bundle(s) on top of the wheat and greens with another rubber band around everything.
5. Make a big bow and attach this to the top of the spray with a wire.
You’re done!!!
Fresh cedar, pine and fir will survive hanging up outside in the cold and stay fresh looking for about a month. Inside the house, they will dry out within two weeks, but will retain their colour and look fine for quite a while. Fresh holly will freeze and turn black if left outside.
Try making smaller variations of this pattern to use as decorations for packages, to hang on railings and anywhere around the house, inside and outside. These make very good hostess gifts for the holiday season and are always appreciated.
Woodland Arrangements
The newest trend in floral design is the natural, woodsy look of birch bark, moss and the subdued colours of the forest. Birch bark tubes and sheets taken from fallen, rotted trees are easy to make into containers of various shapes and sizes. Other materials can be gathered from the back yard, or from the woods on your next Sunday outing. Use coloured flowers sparingly to provide accents to match your decor, or your mood.
Start with a birch tube about 6″ tall and cut the bottom edges to get a level base. You’ll need a piece of floral foam for dried flowers just a bit narrower, and a bit taller than the birch bark. Wrap the foam in some paper, then stuff it snugly into the tube. The paper is to keep the pieces of foam from shedding onto your furniture. If there are any gaps along the sides, fill these with slivers of foam until you have a good tight fit.This design uses a crescent shape, tall on one side, shorter on the other, in a nice, even curve. You want to use only a few different elements for a simple, elegant arrangement. We have used red dogwood twigs, green barley, blue globe thistle and one blue-green hydrangea, with a bit of white lichen to fill the edges. You can use as few as three elements, or even just two in a very small pot, where the lichen counts as a third colour. The goal is to recreate a piece of the forest so you want it to look very natural and simple, as if the plants were growing in the pot.
Start with your largest skeletal elements, the dogwood twigs. This will establish the curve, height and width of the arrangement. Then work your way toward the centre, the barley next, in natural looking clumps, and then the globe thistle. The stems of larger flowers, like the globe thistle can be left exposed to add to the curved lines of the design. You don’t want both sides to be even, and you should make an effort to place flowers off of the central plane. That means make some of them stick out forwards or backwards or tilted down, from the main lines.
The second last element is the lichen. Soak it well, squeeze out any excess water and glue the pieces into place around the edges only of the pot. If there are holes or cracks in the bark you can make the lichen appear to be growing out of the bark. This works well with green moss too.
The last piece to go in is the big focal point in the centre. Use a large pine cone or flower, or try a fungus conk, taken from the same rotted birch trees. If there are still gaps in the arrangement try adding a few more stems, or glue some pieces in place. You don’t want to make it balanced, sometimes you need to remove a stem rather than add another one.
Remember, this is for fun, you won’t get marked on it, so just enjoy yourself and go with the flow. If it looks good to you, then it’s probably right. You can try different design shapes using similar materials, a straight up, vertical arrangement, a long low coffee table piece, or maybe the old standard triangle shape. The bark sheets make an interesting background for a wall hanging or make a flat, curved pan for a table centerpiece.
You can find most of the materials you’ll need in your back yard!