![]() Prices in Canadian Dollars.
Prices in Canadian Dollars.![]() Prefer to call and speak to a floral agent? 1-877-277-4787
Prefer to call and speak to a floral agent? 1-877-277-4787

Preserving Flowers and Herbs
Preserving Flowers and Herbs
The colour and fragrance of your summer garden can be preserved to enjoy all year long. People have always dried flowers and herbs for medicinal and decorative purposes through various traditional methods and today we have even more choices for preserving our best blooms.
Quick Links
Which ones?
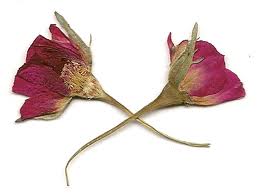
Most flowers will air dry. Try anything at first, when you are just learning. Any of the “everlasting flowers’ from the seed catalogues will dry well. Roses are very good and keep some of their scent. Plants with more cellulose, sturdier cells, like grains, or strawflowers, will hold their shape and dry better than soft fleshy ones like begonias or tulips.
Picking
In general you should pick flowers just before they are fully mature, as they continue to develop a bit while drying. If the roses are starting to drop petals when you hang them up, they will continue to drop petals as they dry and you’ll be left with an empty stem. Slightly immature flowers also have a stronger connection between the petals and the stem and as they dry this should become more rigid, and stronger, if the flower is in the right stage of maturity.
Preparing
It is much easier to clean fresh flowers than dried flowers. Before processing, remove any brown, misshapen or dis-coloured petals and leaves. It is not usually necessary to remove the leaves from the stems, except for large plants like sunflowers, where the leaves are large reservoirs of moisture.
Drying
Best results will be achieved from the fastest drying. The longer it takes to dry a bundle, the more likely you will lose colour, have damage from fungus and bacteria, and leaves will turn yellow rather than stay a fresh green colour.
You will need a warm place, with good ventilation, and no direct sunlight. The warmth tends to dry the plants faster. The ventilation carries the water vapour away from the plants and so speeds the drying. Direct sun, right in the south window, will bleach colours out of leaves and flowers within two weeks. Indirect light is not so much a problem.
Most plants will take 1 to 2 weeks to dry completely. Small fine plants, like larkspur will dry more quickly than heavy, large plants like sunflowers. Over this period, some indirect light will not seriously affect colour.
Storage
Once the bundles are dry they should be wrapped to prevent damage and packed away in a closed box. Newspaper works well for wrapping. This keeps the bundles separate and protected from dust, breaking, and sunlight. The bundles should be laid down flat in the box, not standing up. If they are standing up it is easy to break the tips off. Label the box on the outside so you don’t have to open it every time you’re looking for those pink peonies. Usually dating the box is a good idea too.
Dried leaves of herbs for cooking should be packed in air tight cans or jars, and kept out of the light too. Labeling is very important here, it’s harder to tell basil from oregano, 6 months later when they’re all crunched down to fine green leaves.
Silica dried and freeze dried flowers should be stored in an air tight box with some desiccant inside. Use a bit of silica gel in a cloth bag for desiccant. Even table salt will work – in a pinch. This will keep moisture from the air from affecting the blooms.
AIR DRYING
The simplest method is just to make your flowers or herbs into bundles and hang upside down to dry. Use rubber bands to secure the stems. The stems will shrink as they dry, and string or wire will become too loose to hold the dried bundles. Hanging upside down keeps the shape of the flowers looking natural once they are dried. This, of course, does not apply to flowers like Chinese Lanterns or Love Lies Bleeding that are supposed to droop downwards normally, these plants you would dry standing up in a vase.
For large flowers you should stagger the heads so they are not touching each other. Where the flowers are close together, there’s less air movement so moisture can build up, and fungus can develop.
The bundles should be no more than a handful thick at the stem ends. If the bundles are too large, the center of the bunch does not dry properly and mold can grow in the middle. When you open these bundles up to use them, the inside 40% is spoiled.
Herbs
Herbs can be dried in bundles as well, usually, the bundles are smaller for quicker drying because you want to preserve the colour as well as the volatile flavor oils. You can also dry herbs flat on a screen. If you clean the useful leaves off the stems first and dry only the leaves, they will be done sooner. Be sure to spread the leaves out well enough to allow air movement all around and turn or stir the leaves every day until dry. Most herbs handled this way will dry in 2 – 3 days under good conditions.
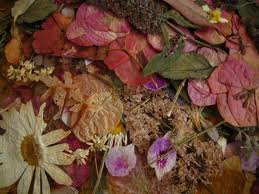
Potpourri
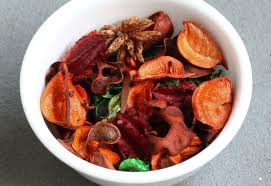 You can also dry individual flowers, petals and leaves for potpourri on screens this same way. Full flower heads will take longer to dry, and it is very important to turn these often to prevent misshapen flowers, and mold growing on the undersides of the flowers. Once dry, these should be packed in clear plastic bags. You will be able to see easily, what’s in the bag, and the plastic will keep moisture from the air away from the dried materials. You can find further info and a recipe for Potpourri here.
Heads up
Certain flowers, peonies and sunflowers, for instance, can be dried heads up with the stems dropped through a screen made of chicken wire or metal mesh with 1.5 – 2″ squares. For peonies this can give you a larger, more open flower. Hanging flowers tend to wilt and close up as they dry so you get a smaller, less full flower. With the screen method, you can get them to open even more. The problem with this is that not all of the peonies will open properly on the screen so you must babysit them as they dry. Take out the odd shaped ones before they’re fully dry. Shake them gently to restore a more normal shape and hang these upside down to finish drying. The remaining good ones will dry in about 2 weeks.
SILICA GEL DRYING
This method has been used for centuries. The earliest practitioners did not have silica gel, however, they used clean, fine sand or even salt. Dustless kitty litter will work and there are some substitutes for silica on the market as well. Some people use borax.
Silica drying works on all flowers, and extends the range of materials that can be dried. Lilies, orchids and other flowers that do not air dry well can be silica dried to give spectacular results.
The best quality silica gel will have very little dust in it and should have blue indicator crystals. The crystals are blue when the silica is dry and will gradually lose colour as the silica absorbs moisture. When they are completely colourless you should put the silica in a flat pan in the oven at 250°F until the crystals change back to blue. Store in an air tight container. You can re-use silica gel many times, for many years. It will eventually break down and get more fine dust particles, which can affect the quality of the finished flowers so you may have to replace it at some time.
Silica gel is harmful to your health. The dust particles will cause irritations of your throat, nose, lungs, eyes, and skin. For best safety you should wear rubber gloves and avoid inhaling the dust. If you are doing a large quantity of silica drying you should be wearing a good quality dust mask as well. Always work in a well ventilated area and clean up any dust and crystals from the work place when you’re finished. Try working outside.
You will need some air tight plastic containers, ice cream pails work well, as well as smaller ones. Put a layer of silica on the bottom of the container, about ½ to 3/4 inch. Place individual flower heads (no stems) upright on the bed of silica. Take the time now to make sure the petals are shaped the way you want them to end up. Gently pour more silica over the flowers so that the crystals fall between the petals and around the blooms. The crystals will draw the moisture out of the petals and leave it in the same shape without wrinkling or shrinking.
Don’t pour the silica on so roughly that you bend the petals over sideways or splay out the flowers in an unnatural position. Continue to add silica until the flowers are completely covered. You can add more flowers to the container, as long as they don’t touch each other. Where they touch, mold will develop. You can make several vertical layers if your container is deep enough.
Once full, close the lid on the container and wait. Most flowers will dry in 2 – 3 days. Larger flowers and full roses should be left 4 – 5 days. You can speed up the process by micro waving the whole container for 30 second pulses, 2 or 3 times. After micro waving, leave the flowers in the silica overnight and remove the next day. You can also put the container in the oven at 200 F for an hour or so. Or warm the oven and turn it off. Then put the container in over night.
If you remove the flowers right away after heat treating in the microwave or oven, the silica tends to stick to the petals. Waiting an extra day reduces this problem.
To take the flowers out of the silica, gently pour the crystals into another container to reveal the flowers. They may be brittle and certainly they will be fragile, so handle carefully. If they have been left in the silica too long, they will be more brittle. As they are exposed, gently lift them out and put in a secure storage container.
The blooms can be sprayed with a floral preservative, lacquer spray, or even hair spray to give them a protective coat. If your silica is dusty you will need to shake or brush some of the dust off the petals.
Pouring the silica back and forth releases lots of dust. Stand back from the container, don’t breathe in the dust, wear a mask, do this outside, this is the high risk part of the operation.
Silica dried flowers have better colour and very much better form than air dried flowers. They will retain these qualities only if stored properly with some desiccant and protected from mechanical damage.
GLYCERINE TREATMENT
Glycerine is a viscous, oily liquid used in hand creams and soaps. Glycerine treatment leaves the plants supple and soft, less brittle and less prone to breakage. It is often combined with a dye so the finished product is softer and coloured as well.
Best results are obtained if the glycerine is drawn up inside the plant. Plants must be fresh cut and still alive, able to draw water up the stem.
Mix 1 part glycerine with 3 parts water. More glycerine can be used on heavier plants like salal and less glycerine on fine plants like baby’s breath. The glycerine is easier to mix if you start with warm water. Mix well. Add the dye at this time if you are colouring the plants too. It is a good idea to add some fresh flower preservative to the water. This will keep the plants healthier and the water cleaner.
Stems should be re-cut under water to make sure there is a good uptake of solution. Stand the plants upright in the bucket of glycerine/water and wait. Most plants take almost 2 weeks to fully absorb the glycerine. You can monitor the progress by the colour change in the stems, leaves and flowers. You should check the stem ends regularly and re-cut them a few inches every 2 – 3 days to keep the flow of glycerine/water going well.
The glycerine is a large molecule. It cannot enter the plant cells and it does not evaporate with the water from the plant. As it travels up the plant it moves in the spaces between the plant cells. The water gradually moves out of the cells and out of the plant completely leaving more and more glycerine stuck in the tissues. Eventually there is mostly glycerine and very little water left in the plant.
Take the plants out of the bucket, and hang to dry for a few days, just to remove the last bit of water. You can re-use the glycerine solution several times. Filter it and add some fresh flower preservative to reduce fungal and bacterial growth. Store in a sealed container. You can feel how slippery the solution is. When it is not slippery any more the glycerine has been used up and you need to start again with fresh glycerine.
Straight glycerine is a skin irritant. Wear gloves and avoid contact with skin, and eyes. Do not ingest. Keep away from animals and small children. Handle with care. You can buy glycerine at farm supply stores, it is sold as a treatment for milk cows by the litre or gallon.
DYEING
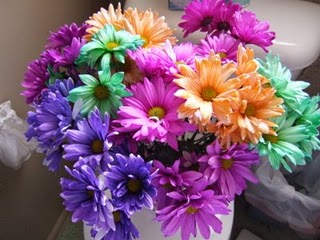 Dyeing flowers gives you an infinite range of colours not always available in the natural materials. All plants have a waxy coating on the surface of leaves, stems and petals. Depending on how thick this layer is, the dye will attach better or worse to the plant. Heating the plant materials will thin out the waxy layer and allow the dye to soak in better.
Plants with neutral natural colours, or colours similar to the dye will give better results than strongly coloured ones. Flowers and plants with lots of surface area like timothy grass pick up the colour better than smooth surfaces like poppy pods.
There are powdered dyes and liquid dyes specifically for plants. Any of these can be applied as a dip for dried flowers or in the water bucket for fresh flowers to take up through the stem. You can use food colouring for small quantities. Fabric dyes will work well too, and are available in a wide range of colours.
It can be useful to dye a variety of materials with the same dye lot so that you will have matching pieces to use in an arrangement. Also, the first bundle dipped into the dye will have the darkest colour and the last bundle will have the lightest colour as the dye gets used up. This range of shades of the same colour can also be attractive in an arrangement.
For fresh flowers, just mix the dye in the water bucket and stand the stems in the mix. Be sure to re-cut the stems regularly. Add some fresh flower preservative to keep the water clean. You can reuse the solution as long as it’s not contaminated with fungus or bacteria.
For dried flowers dip the bundle, heads down into the dye solution. Leaving the bundle in longer will give a darker colour as will repeated dips. Fabric dyes often require hot water and may give better results with hotter water.
You will need to hang the bundles up to dry after dyeing. This should take only 2 – 3 days at most for flowers that have been previously dried.
Colours will change as the plants dry. The liquid mixture is never the same as the finished product. Successful dyeing requires lots of experimentation. Try mixing colours to get just the right shade, or diluting the mix for light shades. Good luck.
It’s very easy to paint dried flowers too. You can use craft spray paint which dries quickly or regular spray paint which takes longer to dry. Try also mixing latex paint with water, 1 part paint to 2 or 3 or more parts water, and using this for a dip for the dried flowers. The advantage of paint is that you can get a very wide range of colours.
FREEZE DRYING
This is a very high tech way to preserve flowers. The freeze dryer itself is a large machine that looks sort of like one of those really big washing machines at the laundromat. The flowers are dried under vacuum, and very low temperatures for about 10 days, depending on the water content of the starting materials. The machine costs about $50,000.
This methods gives a very good product however. The flowers have very good colour and form. They are often sprayed with a preservative/sealant to prevent moisture from re-entering the flowers and reducing the quality.
You can freeze dry almost anything, so this greatly increases the range of possibilities. Most common are roses and lilies, but you will find orchids, vegetables and fruits.
PRESSED FLOWERS
Delicate flowers can be pressed between the pages of a phone book. If you add weights to the top of the stack and have at least 20 pages of phone book between flowers you can get a very nice product. You can fill the page with flowers as long as they don’t touch each other. There are many flower presses available, using blotter paper and frames with screws to keep the pressure on.
Pansies, violets, azaleas, any fine textured flower will dry well. Don’t forget to press some leaves too for adding to your pictures and cards. Stay away from flowers with high water content, fleshy leaves or bulky form. Large flowers like tulips or lilies won’t work as whole flowers because of the bulky calyx, but you can press individual petals and reassemble what looks like the whole flower later. The calyx on roses is too large to press. Again, try individual petals.
The finished flowers can be mounted with a dab of glue to make pictures, cards and other decoration. Pictures made up and mounted behind glass are not difficult. Just get a nice frame with a good clear glass front. Cards must be covered with a layer of clear Mac Tac or other protective cover. Some people lay the flowers on the top of fancy wooden boxes and lacquer them in place. You can also put them between panes of glass for window hangers.
Storage
Dried flowers will absorb water vapor from the air quite easily. On a rainy day, the petals get softer and contain more moisture than on a dry day. Each time the flowers absorb this moisture, however, they will continue to degrade. If they absorb a lot of moisture (if you kept them in the bathroom for instance) they would eventually lose their colour, and may even turn brown.
For long term storage you want to keep this moisture away from the dried materials. The newspaper wrappings on the bundles will absorb most excess moisture. The desiccant in the box of freeze dried flowers does the same job. Sealing the rest of the materials in air tight bags, jars and boxes will keep most flowers and herbs safe for years. Be careful that the flowers or herbs are completely dry before you pack them away, however, it’s very easy to get mold growing inside the air tight plastic bag.
Conclusion
There are many methods for drying flowers, and many flowers and herbs suitable for drying. Don’t believe any one if they say you can’t dry this, or that won’t work. Try it any way. Some techniques may work for you and no one else.
EDIBLE FLOWERS
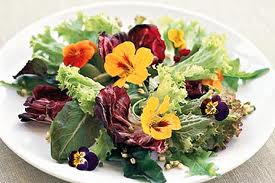
Many flowers are edible. Flowers should be of best quality with no bruises, spots, insects or insect damage. Fully opened or almost fully opened flowers are best, rather than buds. Flowers should be picked with a short stem (l” is OK) just to make them last longer in storage and easier to handle. These are mostly used in salads and as garnishes. The size is important. Flowers should be about 3/4″ across, not too small and not too large.
The following list is not exclusive, there are many more types that are edible.
- Alfalfa
- Bachelor Buttons
- Begonia
- Borage
- Calendula
- Carnation
- Dianthus
- Geranium
- Herb flowers
- Marigold
- Nasturtium leaves and flowers
- Pansy (very good)
- Peony
- Phlox
- Rose
- Schizanthus
- Snapdragons
- Stocks
- Sunflower petals or small flowers
- Sweet Rocket
- Sweet William
- Tulip
- Viola
Some flowers are definitely toxic, don’t pick these:
- Monkshood
- Pyrethrum
- Solanum (potato family)
- Foxglove
- Lupine
- Morning Glory
Other flowers, while not toxic, just don’t taste very good,Feverfew, Poppies, or have poor texture, yarrow, globe thistle. Handle these flowers with special care.
Pick best quality, clean flowers with no water on them. Pack in a plastic bag or rigid plastic box like the ones at the bakery. Keep hydrated with a moistened paper towel in the bottom of the box. Don’t store too long before using.
KEEPING GOURDS FRESH
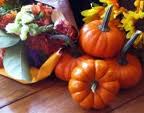
Yes you can keep those nifty gourds looking good for years if you do it right. Start with fresh, healthy, mature, gourds with good color and a nice firm, skin. They need to cure in the warm sunshine for a few weeks to really finish off. Pretend they are in a field far south of here, maybe Minnesota, and they have an extra month to really do what they’re designed to do. The skin will harden up and protect the seeds inside from marauding animals and pests of all kinds until spring when they will grow again.
Wash the gourds carefully and don’t scratch or damage the skin. Dry them well and put them into a warm, sunny window so that there is good air circulation around all the fruits. Best if they don’t even touch each other. If you were really nice to them you’d turn them every few days to get a nice even tan.
Once they are really firm you can polish them with a clean, soft cloth, just like polishing shoes. The skin contains a natural wax which will buff up and give you a nice shiny gourd.
If you were really sure you had removed most of the water from the gourd, you could spray it with a clean varnish, both a matte or shiny surface would be interesting. We have sprayed them gold for Christmas Eggs and pale blue and pink for Easter Eggs..
Never poke holes in the gourd. Don’t break the skin. Our enemies are the fungi and bacteria living all around us, don’t let them at the susceptible insides of the gourd. The plant has natural defenses that will enable it to fight off most normal wear and tear, if the system is intact and healthy.
This drying method will work with other thick skinned members of the Cucurbit family, like pumpkins, and squash, but not soft types like zucchini or cucumbers.
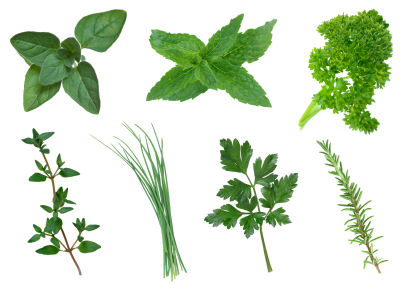
CULINARY HERBS – FRESH AND DRIED
It may be economically feasible to grow herbs year round in a green house, but this requires some study, and careful management – something to work towards. The simplest is fresh product during the summer, and dried product the rest of the year.
There are also many plants grown for medicinal uses. We call these botanicals. This would include such things as Raspberry leaves, Red Clover Flowers, Birch leaves, plantain root, and so on.
Picking
Fresh herbs should be picked when the leaves are dry, without rain or dew on them. Do not wash the plants. Pack loosely in clean plastic bags. If you poke a few holes in the plastic bag, this will help the plants to breathe and they will last longer in the fridge. A mulch around the growing plants may reduce the amount of soil on the leaves and reduce the need for washing. Mint is especially bad for holding soil on the leaves.
Dried herbs are of most use if they are picked on whole stems and bundled like flowers for drying. These can be tied into wreaths, used in basket arrangements and several other decorator items. The longer the stem, and the less processed the plant is, the more useful it will be.
Second grade leaves and stems can still be used in potpourri and for making fire starters. Since all parts of the plants are fragrant, these are very useful.
Cultivation
Many herbs are from the mint family, Labiatae. All of these will be easy to propagate from cuttings, or layering. They will have square stems in cross section, and labiate (like tiny snapdragons) flowers. Seeds are produced freely and should be collected.
To be safe, grow the varieties you are familiar with, or that you know will grow well in your area, and try only a few experiments at one time. A large volume of one type is easier to handle than small volumes of many types.
Many herbs do better if kept well watered, and in full sun. The flavour comes from the aromatic oils in the leaves, and these will be most developed in healthy, vigorous plants. Most herbs change flavour once they go to flower, so try to collect the leaves before this happens. Repeated shearing of plants like mint and oregano can delay flowering until late in the summer. An application of nitrogen fertilizer in mid summer can also help to keep the plants producing leaves rather than flowers.
HERBS – FRESH AND DRIED
Anise Hyssop. Agastache foeniculum. Giant Blue Hyssop. Perennial. Native Plant. Mint family. Direct seed. Could be fall planted. Can be propagated from root divisions or stem cuttings. Licorice scented leaves used in desserts and dried in tea and for medicinal uses. Harvest leafy stems before flowering. Flower stalks are attractive, blue, and can be collected for ornamental uses. Harvest when they are firm and well filled and hang to dry. Seeds are valuable and produced prolifically, collect these too. This plant is highly recommended as it is a multi purpose plant.
Basil. Ocimum basilicum. Basil is a tender annual in the Mint family. There are many varieties. You can direct seed in late May and repeat plantings are recommended. Transplants are quicker starts but they are susceptible to fungal stem rot (Fusarium) while still in the seeding tray. For an organic fungicide, try mixing crushed stems of Horsetail (Equisetum – a common weed) into the soil, or making a tea from Horsetails and use this to water the basil weekly, while in the seeding trays and after transplanting into the garden. Horsetails contain a natural fungicide which will not affect the edible qualities of the basil.
Basil likes warmer temperatures, medium moist, rich soil and slightly dryer conditions to hold back the fungus. It needs protection from the hottest mid-summer sun, and is also very frost sensitive. If you direct seed into the garden, try covering the earliest plantings with a row cover for a quicker start. The row cover will increase the temperature around the plants, improving germination and growth. Later in the season you can put a white sheet over the tunnel and use it to shade the same rows. Sun scorched basil has a bronze sheen on the leaves. Use the tunnel again at the end of the season to protect from frost.
Use a mulch such as straw or newspaper around the bottoms of the plants and between rows to keep the plants as clean as possible. You do not want to have to wash the plants after harvesting.
Don’t let the plants go to flower. They will stop producing useful leaves, and the flavor is not as good. Fertilize every few weeks with a light dose of nitrogen. Don’t drought stress the plants. The fungal stem rot can also create a stress that makes the plant flower too soon. You can sometimes cut the flowering stems off and make the plant go back to leafy growth, but this doesn’t always work.
The standard variety is called Sweet Basil. Try Green Ruffles, and Purple Ruffles, showy but less fragrant. Lettuce Leaf Basil is very popular, as are purple leaved types. There is also Mammoth Basil, Cinnamon Basil, Lemon Basil, and many more. It is worth experimenting with new types. Look for interesting flavours, leaf shapes or colors.
For fresh herbs, pick leafy tops of stems every 2 – 3 weeks. Alternatively, you can plant enough seed so that you can harvest the whole plant from several rows each week. Plant enough area to give you continuous yield. Don’t wash the leaves. Pack loosely in a plastic bag and store in a cool place, but not in the fridge.
Basil is not as good dried as fresh. For drying, pick small bundles of 10 – 15 stems, tie tightly with a rubber band and hang to dry or lay stems and leaves out on a cardboard flat or basket. Once dry, pack the leaves and bundles away in a plastic bag so they stay dry.
Basil is a very high demand crop. It is a bit difficult to grow for beginners, but we have had good results recently, so don’t give up.
Borage. Borago officinalis. Annual. Direct seed. Repeat plantings. Can be planted in late fall and again in early spring. Self sows. Young leaves have a light cucumber flavor. Mature flowers used fresh in salads. Easy.
Catnip. Nepeta cataria. Perennial. Very easy from direct seeding, transplants or cuttings. Mint family. Used as a cat treat, and sometimes for tea. For these herbal uses, collect leafy, non-flowering stems in small bunches. Tie with a rubber band and hang to dry. Catnip has attractive flower stalks/seed heads, too. When the flower stalks develop a purple blush, pick 10 – 15 flowering stalks per bundle and hang to dry. Produces seed prolifically, so collect this from more mature stems. Catmint is not the same as catnip, choose the true catnip.
Chamomile. Matricaria chamomilla. Annual. Try direct seeding in late fall or early spring. Self Sows. Fragrant flower heads are dried for tea. Lay out to dry and pack in clean plastic bags when completely dry.
Chervil. Anthriscus. Umbelliferae. Dill family. Similar to parsley, but more distinct flavor. Young leaves are used in soups and salads. Collect leafy stems before flowers appear. Direct seed fall, early spring and repeatedly through to July. Can save seed from over mature plants.
Chives. Allium schoenoprasum. Perennial. Easy from seed, but usually grown from divisions. Easy to harvest early in season before flower stalks appear. Some flowers mixed with leaves is good because the flowers are edible too. Cut whole plant low to ground and allow to grow back fully before re-cutting. Can get 3 – 4 cuts through summer. Tie handfuls with a rubber band for easier handling. Does not dry well, unless cut into small pieces and quick dried in a worm spot.
Coriander. Cilantro. Coriandrum sativum. Unbelliferae. Dill family. Direct seed. Try fall planting, then repeat sowings from early spring to late July. Popular in Mexican and Chinese cooking often called Chinese parsley. Cut leafy stems frequently before flowers set. Better fresh than dried. Can save seed from over mature plants.
Epazote. Wormseed. Chenopodium ambrosioides. Related to Lamb’s Quarters. Strong scented foliage used for Mexican cooking.
Dill. Anethum vulgare. Umbelliferae. Direct seed. Can be planted in fall. Will self sow. Should be repeat planted every two weeks from early spring until end of July or later. Best quality for herb use is the leafy, young stems, 6 – 8″ tall, before flowers appear. Pick handfuls and tie loosely with a rubber band for easier handling. Aphids can be a problem, but mostly on older plants. Try spraying with water before harvesting. Try getting rid of ants near the garden to reduce aphids. Also good dried. Save seed.
Fennel. Foeniculum vulgare dulce. Umbelliferae. Dill family. Annual. Easy from seed. Harvest the bulbous crown of the plant. The leaf petioles make a solid round base used in soups and salads. Fresh leaves used as a herb also. Common one is green, but try Bronze or Florence Fennel.
Garlic. Allium sativum. Very high volume. Very good if picked with leaves still on for braiding. Plant individual cloves in broad bands 5 – 6 cloves wide, rather than single rows. Garlic needs to be cured in the sun, or a warm place to harden off the bulb and prevent sprouting. Braids can be dried and decorated with herbs, peppers, and flowers later. Don’t use Elephant garlic. Best to plant in the fall, September or October, to get good growth before winter and large bulbs next year. Can also be planted very early in the spring. Even small bulbs are useful for ornamental purposes.
Garlic Chives. Allium tuberosum. Perennial. Popular with Chinese restaurants. Harvest leaves like chives. Propagate from divisions.
Horseradish. Armoracia rusticana. Perennial. Easy from seed or root sections. Roots can be cut and crown replanted to maintain stock. Takes 2 – 3 years for large roots. Smaller, fine roots 1/2 – 3/4″ diameter, are better quality and higher demand. Roots must be washed and cut into sections no more than 12″, packed in plastic bags. Handle like a fresh herb.
Juniper Berries. Juniperus spp. Used in cooking wild game. Collect full, blue berries, from almost any type of juniper bush. Native types are more authentic. Rinse and dry on a flat tray.
Lavender. Lavendula vera. Perennial. Mint family. Many types. Try Munstead, English Lavender, Provence Lavender, Sweet Lavender, Lavender Lady. Not very winter hardy, can dry out and freeze over winter. Grow in protected sites, not subject to early spring thaws, east facing rather than south facing. Mulch well and water in fall, and don’t cut the plant down too short. Easy from seed. Can propagate from stem cuttings. Plants will increase in size over several years. Harvest flower spikes, leaves and stems for use in potpourri and arrangements. Clean, organic flowers can be used in cooking. Recommended.
Lemon Balm. Melissa officinalis. Mint family. Easy from seed. Can be propagated from stem cuttings. Perennial. Fresh leaves strongly lemon scented. Dried leaves good for tea. Fresh used in salad and soup. Harvest fresh, leafy stems.
Mint. Mentha. Perennial. Many kinds of mint. Almost all are useful for something. Spearmint (Mentha spicata) is the most commonly used in cooking. It has a spear shaped, lanceolate leaf. Peppermint (M. piperita vulgaris) is less popular, but it makes a very nice tea. It has a round, often fuzzy leaf with a scalloped margin.
Fancy types of mint are in high demand; Orange mint (M. piperita citrata), Apple mint, Ginger Mint, Pineapple Mint and so on. Not all of these mints will be hardy in Alberta. Take cuttings or whole plants inside for winter if you want to save them. Look for variegated foliage, and different leaf shapes, but stay away from small leaved varieties like pennyroyal.
Mint can be started from seed, but it cross pollinates freely, so if you want a certain variety you must propagate from root divisions, root sections and stem sections from a known variety.
The plants are very invasive, spreading by underground stolons. Mints enjoy cooler soil and more soil moisture than most plants. Try segregating an area just for mint, where it can fill the bed freely, and you can cultivate around the edges only if you want to control it. Mint will grow in low, moist areas where other plants will not.
Collect fresh leafy stems and pack loosely into a plastic bag. Mint leaves are often carrying some soil on the tiny hairs on the undersides of the leaves. You may need to wash mint. Use at least two rinses. Use a good heavy mulch of straw or paper to avoid this problem.
For drying, tie handfuls into small bundles with a rubber band and hang to dry. Loose leaves and small stems can be laid out to dry in a flat pan or basket. Lower grades can be used in potpourri.
Spearmint is a high volume crop, both fresh and dried. If you have an appropriate spot in the garden, we recommend you plant some mint.
Oregano. Origanum vulgare. Perennial. Standard herb. Many types of oregano available in the seed catalogues. Greek Oregano (O. heracleoticum) is the true oregano. Try Kalitera Oregano, Italian oregano, or any others. Stay away from dwarf or small leafed varieties, these are too much work for small yield. Look for variegated or fancy varieties. Older plants will produce tall flower stalks, very good for drying for decorative uses. High volume. Will start easily from seed, but fine seed is difficult to work with. Transplants for first year is a good way to start.
Marjoram, Sweet. Origanum majorana. Annual. Mint family. Very fine seed, so transplants are more reliable. Very popular herb. Seed heads on stems dry well in bundles for decorative uses. Very fragrant. Will do better in rich soil and full sun for better flavor. High volume. Harvest leafy stems before flowers appear. Try direct seeding in a finely textured seed bed for taller, more bushy plants.
Parsley. Petroselinum crispum. Biennial. Umbelliferae. Dill family. Try fancier varieties. Curled leaf types are good, and Italian Parsley is also good. Easy from direct seed. Try repeat plantings.
Perilla/Shiso. Perilla frutescens. Decorative foliage, related to Coleus. Mint family. Cinnamon scented leaves for Chinese cooking and garnishes. Easy to grow. Direct seed or start indoors and transplant.
Rosemary. Rosmarinus officinalis. Standard type. Not hardy. Woody. Similar to lavender. Look for winter hardy new varieties. Sheltered location. Bring plants inside over winter. High demand. Leafy stems can be dried in bundles for decorative uses. Not recommended for Alberta growers but could be a candidate for greenhouse cultivation.
Sage. Salvia officinalis. Perennial. Mint family. Can be direct seeded, but this is very slow. Use transplants or divisions for faster establishment. Try also stem cuttings. Sage is a standard herb. Try fancy varieties, especially pineapple sage, tricolor sage (for garnishes), purple sage, golden sage (variegated). Some of these specialty types may not be completely hardy.
All sage plants should be well mulched and watered for winter. Will grow well in full sun, and will increase in size over time, spreading by underground runners and side shoots. Will produce viable seed that can also be collected. Can be planted in a large bed, rather than in rows.
Harvest leafy stems and pack loosely in a plastic bag. Do not wash. Use mulch to keep leaves clean. Can be made into small bundles for hanging to dry. Useful in garlic braids and herb wreaths. Very good dried too.
Salad Burnet. Poterium sanguisorba. Annual. Direct Seed. Nut-cucumber flavored leaves used in salads, mayonnaise, soup, etc.
Savory. Summer Savory. Satureia hortensis. Annual. Easy from seed. Will self sow. Can be fall planted. Can make several cuts from tops of plants throughout season. Stems can be bundled for drying for use later. Recommended.
Savory. Winter Savory. Satureia montana. Perennial. Strong flavor. Needs winter protection.
Sorrel, French. Rumex acetosa. Perennial. Direct seed in early spring or fall. Seed heads look like Dock. Lemon flavored leaves very good in salad and soups, and with fish. Collect young tender leaves repeatedly through spring until flower stalks develop, and again in late fall. Try Profusion, new from Richter’s, said to be slow bolting. Not suitable for drying.
Sweet Rocket. Hesperis matronalis. Biennial. Self sows. Easy from seed. Can be fall planted. Young leaves used in salads. Early spring flowers are edible. Collect seed too. Not good for drying.
Tarragon, French. Artemesia dracunculus. Perennial. (Sage family). This is the true tarragon which does not reproduce from seed. Can propagate from stem cuttings or layering. Identified by the strong flavor, dark green leaves, and lack of seed production. Does not dry well.
Tarragon, Russian. Artemesia dracunculus. Perennial. not recommended. Not much flavour. Spreads easily. This is a taller plant, with pale green leaves, which sets seeds freely. Easy to distinguish from the true, French Tarragon.
Thyme. Thymus vulgaris. Perennial. Common garden thyme, English thyme, all are good. Mother of Thyme is not very flavorful, but could be used in potpourri. Lemon thyme is in high demand, as is variegated thyme. Experiment with new varieties. Stay away from creeping varieties, too hard to pick, and wooly thyme is not good either. Individual plants can grow to very large size over several years but they do not develop into something that can be divided. Propagate from cuttings, layering or from seed. Transplants recommended in the first year. Use a mulch to keep the stems and leaves clean. Collect leafy stems into plastic bags. Good as a dried herb too.
</tableclass=”inner-responsive”>